环境:腾讯云服务器,64 位 CentOS-7,root 用户
连接服务器
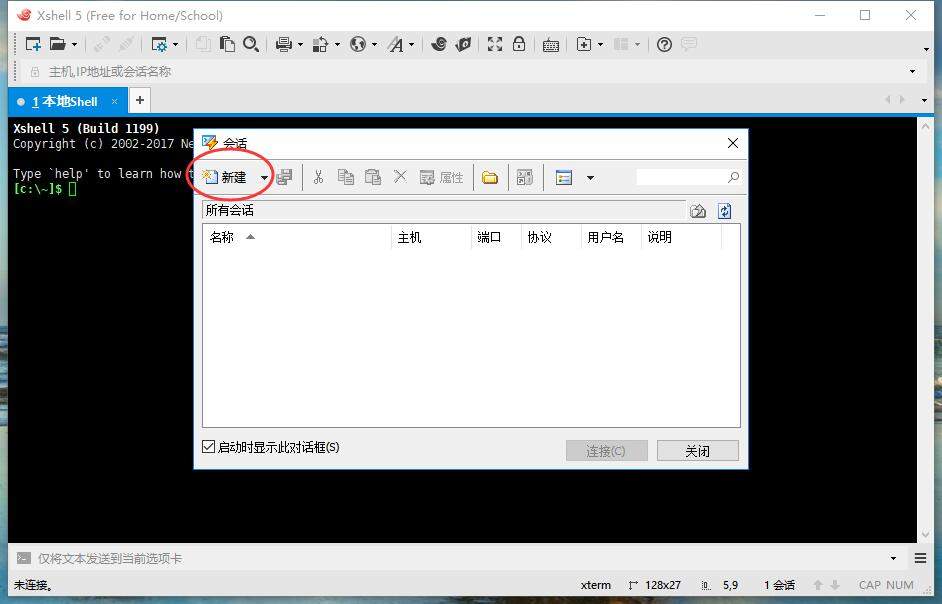
通过 Xshell 连接服务器
1. 安装
略
2. 新建 SSH 连接
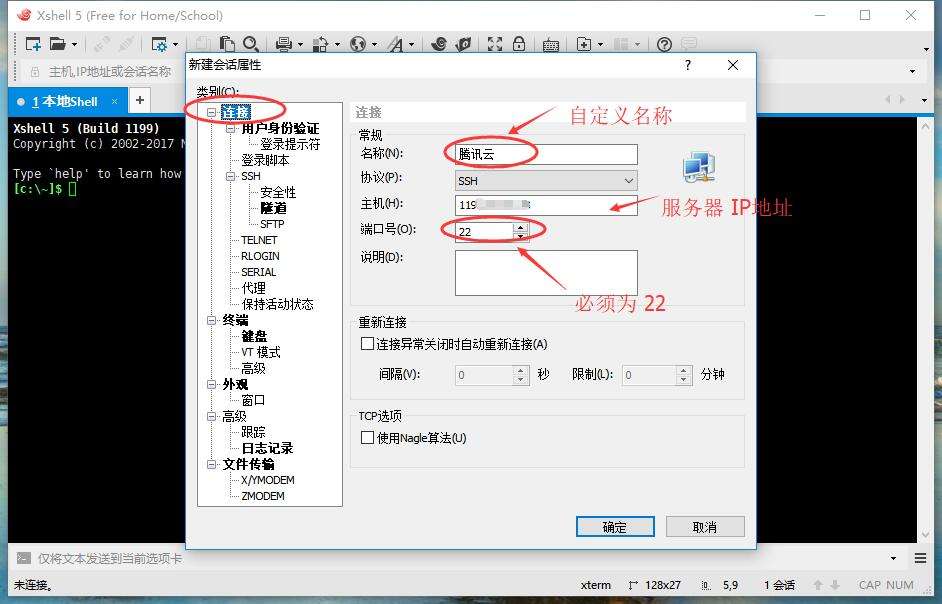
输入完成后点击 “确定”;
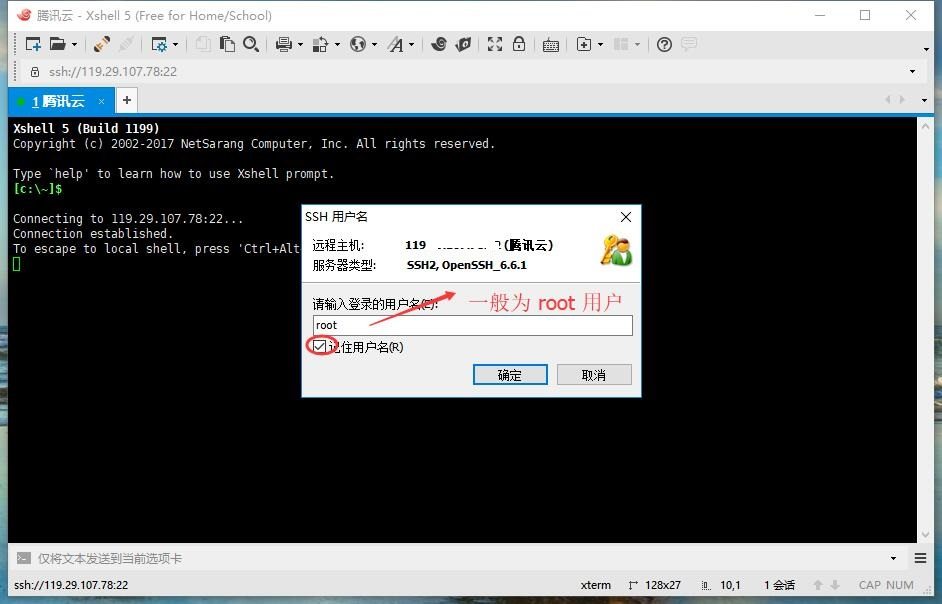
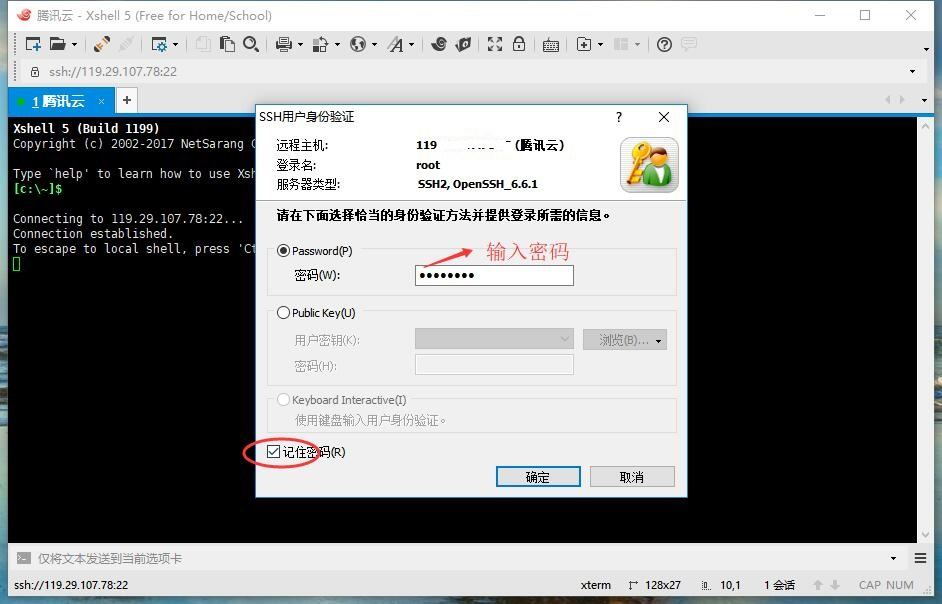
点击确定连接。
参考:
- 腾讯云服务器部署 Node.js 应用
打开多个 Shell 界面
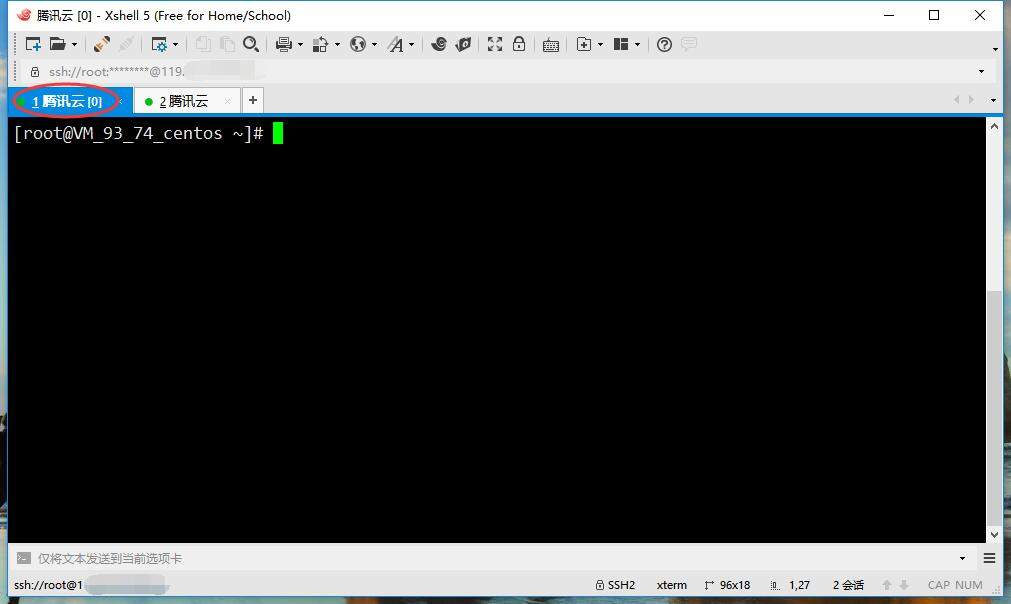
鼠标移到已经连接的服务器 标签(标红处)上,点击右键,选择 复制 SSH 渠道。
更新系统和软件包
1
2
3
| yum clean all
yum update
yum upgrade
|
安装必备软件
配置编译环境
1
2
3
4
5
|
yum -y install gcc automake autoconf libtool make
yum -y install gcc gcc-c++
|
安装 lrzsz(Xshell 环境下用于文件上传和下载)
选择源码安装目录
可以是任何目录,我选择的是 /usr/local/src。
更新/安装 OpenSSL
1
2
3
4
5
6
7
8
9
10
11
12
13
14
15
16
17
18
19
20
21
22
23
24
25
26
27
28
29
30
31
32
33
|
openssl version
cd /usr/local/src
wget https://www.openssl.org/source/openssl-1.0.2l.tar.gz
tar -zxvf openssl-1.0.2l.tar.gz
cd openssl-1.0.2l
./config --prefix=/usr/local/openssl
make && make install
mv /usr/bin/openssl /usr/bin/openssl.OFF
mv /usr/include/openssl /usr/include/openssl.OFF
ln -s /usr/local/openssl/bin/openssl /usr/bin/openssl
ln -s /usr/local/openssl/include/openssl /usr/include/openssl
echo "/usr/local/openssl/lib">>/etc/ld.so.conf
openssl version
|
参考:
- CentOS 之——升级 openssl 为最新版
安装 Nginx
1
2
3
4
5
6
7
8
9
10
11
12
13
14
15
16
17
18
19
20
21
22
23
24
25
26
27
28
29
30
31
32
33
34
35
36
37
38
39
40
41
42
43
44
45
46
47
48
49
50
51
52
53
54
55
56
57
58
59
60
61
62
63
64
65
66
67
68
69
70
71
72
73
74
75
76
77
78
79
80
81
82
83
84
85
86
87
88
89
90
91
92
93
94
95
96
97
98
99
100
101
102
103
104
105
106
107
108
|
cd /usr/local/src
wget http://nginx.org/download/nginx-1.12.0.tar.gz
wget https://www.openssl.org/source/openssl-1.0.2l.tar.gz
wget http://zlib.net/zlib-1.2.11.tar.gz
wget https://ftp.pcre.org/pub/pcre/pcre-8.35.tar.gz
tar -zxvf nginx-1.12.0.tar.gz
tar -zxvf openssl-1.0.2l.tar.gz
tar -zxvf pcre-8.35.tar.gz
tar -zxvf zlib-1.2.11.tar.gz
cd nginx-1.12.0
mkdir -p /var/cache/nginx
./configure --prefix=/usr/local/nginx \
--sbin-path=/usr/sbin/nginx \
--conf-path=/etc/nginx/nginx.conf \
--error-log-path=/var/log/nginx/error.log \
--http-log-path=/var/log/nginx/access.log \
--pid-path=/var/run/nginx.pid \
--lock-path=/var/run/nginx.lock \
--http-client-body-temp-path=/var/cache/nginx/client_temp \
--http-proxy-temp-path=/var/cache/nginx/proxy_temp \
--http-fastcgi-temp-path=/var/cache/nginx/fastcgi_temp \
--http-uwsgi-temp-path=/var/cache/nginx/uwsgi_temp \
--http-scgi-temp-path=/var/cache/nginx/scgi_temp \
--user=nobody \
--group=nobody \
--with-openssl=/usr/local/src/openssl-1.0.2l \
--with-pcre=/usr/local/src/pcre-8.35 \
--with-zlib=/usr/local/src/zlib-1.2.11 \
--with-http_ssl_module \
--with-http_v2_module \
--with-http_realip_module \
--with-http_addition_module \
--with-http_sub_module \
--with-http_dav_module \
--with-http_flv_module \
--with-http_mp4_module \
--with-http_gunzip_module \
--with-http_gzip_static_module \
--with-http_random_index_module \
--with-http_secure_link_module \
--with-http_stub_status_module \
--with-http_auth_request_module \
--with-mail \
--with-mail_ssl_module \
--with-file-aio \
--with-ipv6 \
--with-http_v2_module \
--with-threads \
--with-stream \
--with-stream_ssl_module \
--with-threads \
--with-debug
make && make install
nginx -V
vim /usr/lib/systemd/system/nginx.service
[Unit]
Description=nginx - high performance web server
Documentation=http://nginx.org/en/docs/
After=network.target remote-fs.target nss-lookup.target
[Service]
Type=forking
PIDFile=/var/run/nginx.pid
ExecStartPre=/usr/sbin/nginx -t -c /etc/nginx/nginx.conf
ExecStart=/usr/sbin/nginx -c /etc/nginx/nginx.conf
ExecReload=/bin/kill -s HUP $MAINPID
ExecStop=/bin/kill -s QUIT $MAINPID
PrivateTmp=true
[Install]
WantedBy=multi-user.target
systemctl start nginx.service
systemctl enable nginx.service
|
参考:
- nginx 支持 HTTP2 的配置过程
- nginx 的安装及配置
- Nginx 网站服务器学习与入门
- nginx 如何启用对 HTTP2 的支持
- CentOS 7 中 Nginx1.9.5 编译安装教程 systemctl 启动
安装 Git
1
2
3
4
5
|
yum install git
git --version
|
安装 Node 和 PM2
1
2
3
4
5
6
7
8
9
10
|
yum install nodejs
node -v
npm -v
npm i -g pm2
|
搭建 Blog
部署 Node 服务器环境
1
2
3
4
5
6
7
8
9
|
git clone https://github.com/no-nothing/server.git /home/blog
cd /home/blog
npm i
|
部署 Blog 页面
1
2
|
git clone https://github.com/no-nothing/no-nothing.github.io.git /home/blog/public
|
或者上传本地的 Blog 页面:
先将本地的网页压缩成 zip 包(Centos 默认支持解压 zip 文件)
1
2
3
4
5
6
7
8
|
cd /home/blog
rz -y
unzip 压缩包名.zip -d /home/blog/public
|
启用 Node 服务
1
2
3
4
5
6
7
8
9
|
cd /home/blog
pm2 start app.js --name blog
pm2 save
pm2 startup
|
现在可以通过 IP 地址:3000 访问刚才部署的 Blog 了。
配置 Nginx(同时开启 https)
需要先完成域名解析
获取证书
- 打开腾讯云-SSL 证书管理,点击 申请证书,按提示一步步操作;
- 下载证书;
- 解压下载好的压缩包,选择符合自己服务环境的证书;
将证书上传至服务器
1
2
3
4
5
6
7
8
9
10
11
|
cd /etc/nginx
mkdir ssl
cd ssl
rz
|
修改 nginx 配置文件
1. 从服务器取出 nginx.conf 文件
1
2
3
| cd /etc/nginx
sz nginx.conf
|
2. 修改 nginx.conf 文件
1
2
3
4
5
6
7
8
9
10
11
12
13
14
15
16
17
18
19
20
21
22
23
24
25
26
27
28
29
30
31
32
33
34
35
36
37
38
39
40
41
42
43
44
45
46
47
| ...
upstream blog {
server 127.0.0.1:3000;
}
server {
listen 80;
server_name singple.com www.singple.com;
return 301 https://www.singple.com$request_uri;
}
server {
listen 443 ssl http2 default_server;
server_name www.singple.com;
ssl on;
ssl_certificate ssl/1_www.singple.com_bundle.crt;
ssl_certificate_key ssl/2_www.singple.com.key;
ssl_session_timeout 5m;
ssl_protocols TLSv1 TLSv1.1 TLSv1.2;
ssl_ciphers ECDHE-RSA-AES128-GCM-SHA256:HIGH:!aNULL:!MD5:!RC4:!DHE;
ssl_prefer_server_ciphers on;
location / {
proxy_pass http://blog;
}
error_page 404 /404.html;
location = /40x.html {
}
error_page 500 502 503 504 /50x.html;
location = /50x.html {
}
}
server {
listen 80 default;
return 501;
}
...
|
补充:
完整的 nginx.conf 文件
3. 上传修改后的 nginx.conf,并重新加载 nginx 配置
1
2
3
4
5
6
7
8
|
rz -y
nginx -s reload
systemctl enable nginx.service
|
4. 如果无法访问
1
2
3
4
5
6
7
8
|
firewall-cmd --permanent --zone=public --add-service=https
firewall-cmd --zone=public --add-port=443/tcp --permanent
firewall-cmd --reload
|
参考:
- 个人网站如何开启 HTTPS?
- Redirect all HTTP requests to HTTPS with Nginx
开启防火墙
安装
1
2
3
4
5
|
firewall-cmd --version
yum install firewalld firewall-config
|
开启/关闭指定端口
1
2
3
4
5
6
7
8
9
10
11
12
13
14
15
16
17
18
19
20
21
22
23
24
25
26
|
systemctl start firewalld.service
firewall-cmd --state
systemctl enable firewalld.service
firewall-cmd --zone=public --add-port=80/tcp --permanent
firewall-cmd --zone=public --add-service=https --permanent
firewall-cmd --zone=public --add-port=443/tcp --permanent
firewall-cmd --reload
firewall-cmd --zone=public --list-ports
|
附录:
Systemd 常用命令:
1
2
3
4
5
6
7
8
9
10
11
12
13
14
15
16
17
18
19
20
21
22
23
|
systemctl start <单元>
systemctl stop <单元>
systemctl restart <单元>
systemctl reload <单元>
systemctl status <单元>
systemctl is-enabled <单元>
systemctl enable <单元>
systemctl disable <单元>
|
参考:
- systemd-ArchWiki
- Systemd 入门教程:命令篇
Nginx 常用命令:
1
2
3
4
5
6
7
8
9
10
11
12
13
14
15
16
17
18
19
|
nginx -c /etc/nginx/nginx.conf
nginx
nginx -s stop
nginx -s quit
pkill -9 nginx
nginx -s reload
nginx -t
|
参考:
- systemd-ArchWiki
- Systemd 入门教程:命令篇
firewalld 常用命令:
1
2
3
4
5
6
7
8
9
10
11
12
13
14
15
16
17
18
19
20
21
22
23
24
25
26
27
28
29
30
31
32
33
34
35
36
37
38
|
firewall-cmd --version
firewall-cmd --state
firewall-cmd --list-ports
firewall-cmd --zone=public --list-ports
systemctl start firewalld.service
systemctl restart firewalld.service
systemctl enable firewalld.service
systemctl disable firewalld.service
firewall-cmd --zone=public --add-port=80/tcp --permanent
firewall-cmd --permanent --zone=public --add-service=https
firewall-cmd --zone=public --add-port=443/tcp --permanent
firewall-cmd --reload
|
参考:
- centos7 firewall 防火墙 命令
PM2 常用命令:
1
2
3
4
5
6
7
8
9
10
11
12
13
14
15
16
17
18
19
20
21
22
23
24
25
26
27
28
29
30
31
32
33
34
35
36
37
38
39
40
41
42
43
44
45
46
47
48
49
50
51
52
53
54
55
56
57
58
59
|
pm2 start app.js
pm2 start app.js --name process-name
pm2 start app.js -i 0
pm2 start app.js --watch
pm2 list
pm2 show 0
pm2 info 0
pm2 monit
pm2 stop all
pm2 stop 0
pm2 reload all
pm2 reload 0
pm2 restart all
pm2 restart 0
pm2 delete all
pm2 delete 0
pm2 logs
pm2 flush
pm2 reloadLogs
npm install pm2@lastest -g
pm2 updatePM2
pm2 --help
|
参考:
- PM2 官网
- 腾讯云服务器部署 Node.js 应用